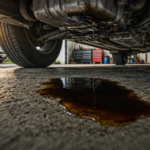

A small oil drip immediately after an oil change is almost always a loose drain plug, an incorrectly fitted oil filter, or residual oil from the service dripping off engine components over the next day or two. These are minor installation issues, not engine damage. Check the oil level on the dipstick first — if it reads normal and the drip slows within 48 hours, it is likely residual spillage. If the level is dropping or oil is actively pooling under the car, the source needs to be found before you drive further.
What to Do First
- Check the oil level with the dipstick on level ground
- Look under the car — is oil actively dripping or just lightly spotting
- If the oil pressure warning light comes on, stop driving immediately
- If a shop did the oil change and the leak started right after, return to them promptly
These checks tell you whether this is a minor installation issue or something that needs professional attention before you drive further.
Is It Normal to Have an Oil Leak After an Oil Change?
No — an oil change on a healthy engine shouldn’t produce a leak. However several situations can look like a leak without being serious: residual oil spilled during the change dripping off engine components over the next day or two, a loose drain plug, an incorrectly installed filter gasket, or an overfilled sump. The oil change itself doesn’t cause leaks in a healthy engine, but it can expose weak points that were already deteriorating.
Why Fresh Oil Sometimes Reveals a Leak
Fresh oil is thinner and cleaner than degraded oil. If the engine had sludge buildup masking a weak seal, new oil can seep through areas that old deposits were temporarily blocking. That doesn’t mean the oil change caused damage — it means the seal was already close to failing and the fresh oil made it visible. In most real-world cases though, leaks that appear directly after an oil change come down to one of four practical causes.
The Most Common Causes
Loose or Improperly Seated Drain Plug
During an oil change the drain plug is removed and reinstalled. If it isn’t tightened properly, is cross-threaded, or is missing or damaged its crush washer, it leaks slowly or drips steadily. Oil dripping directly from the oil pan, centred toward the front middle of the vehicle, and worsening while the engine runs — these all point to the drain plug as the source.
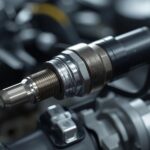
Oil Filter Installed Incorrectly
This happens more often than most people expect. Common mistakes include the filter not tightened enough, overtightened to the point of damaging the gasket, the wrong filter size used, or — the most serious — the old rubber gasket left stuck to the engine with the new filter installed on top. This double gasket situation causes rapid oil loss after driving and needs immediate attention.
Overfilled Engine Oil
Too much oil increases crankcase pressure. That excess pressure pushes oil past weak seals and can cause leaks from the valve cover or rear main seal. Check the dipstick after the car has sat for several minutes on level ground — oil level should sit between the minimum and maximum marks, not above.
A Weak Gasket That Was Already Failing
Sometimes the oil change is the trigger rather than the cause. Fresh oil cleans deposits and if a valve cover gasket, oil pan gasket, or front seal was already deteriorating, new oil reveals it. If the leak appears higher up on the engine rather than near the drain plug or filter, appears after the engine warms up rather than immediately, or runs down from above — the source is a gasket or seal rather than an installation mistake.
VAG-Specific Notes: VW, Skoda, Audi, and SEAT
In the case of the VAG engines 1.0 TSI and 1.5 TSI, it is necessary to replace the crush washer of the drain plug every time the engine receives new oil; otherwise, there would always be a risk of leakage. The recommended value of torque for draining the plug is 30 Nm for most VAG petrol engines four and three cylinders; over-tightening or under-tightening causes problems.
On the VAG 1.0 TSI engine, the oil filter is the same type of filter but without a metal housing: it is installed in a plastic cap. The rubber O-ring installed on this cap also requires changing along with the filter and lubrication with new oil. The dried out or reused O-ring is often found to be responsible for the leak from the filter cap after one or two days following the service.
How to Diagnose the Exact Leak Source (Step-by-Step)
Step 1: Let the Engine Cool
Hot oil and metal cause burns. Allow full cooling before inspecting closely.
Step 2: Check the Oil Level With the Dipstick
On level ground, confirm the oil level sits between minimum and maximum. Above maximum suggests overfilling. Near minimum or dropping quickly means don’t drive until the source is found.
Step 3: Clean the Suspected Area
Use a degreaser or brake cleaner to remove existing oil residue and wipe everything dry. Fresh oil forming on a clean surface tells you far more than stained surfaces.
Step 4: Start the Engine and Let It Idle
Use a torch and inspect around the oil filter, drain plug, oil pan edge, and higher up on the engine block. Watch for fresh oil forming rather than following old staining.
Step 5: Identify the Leak Pattern
Drain plug oil leakage is an indication that there is a problem with the gasket or plug itself. Oil leakage from the filter base is an indication that there is a problem with the filter or its gasket. Higher-level oil leakage is not associated with the installation.
If you’re unsure whether the fluid is actually engine oil, check the colour and texture — see the guide on what colour is the oil under my car for a full breakdown.
Step 6: UV Dye Test (Optional but Very Effective)
Add engine-oil UV dye, run the engine briefly at idle, then inspect with a UV light. The source glows clearly. If oil is dripping rapidly, skip driving and test at idle only.
Can You Drive With an Oil Leak After an Oil Change?
Drive cautiously for a short distance only if the leak is a small drip, the oil level on the dipstick remains within the safe range, and you’re heading directly to a repair shop while monitoring the level closely.
Stop driving immediately if oil is actively dripping or pooling under the car, the oil pressure warning light comes on, you notice a burning oil smell, or you see smoke. Low oil pressure causes serious engine damage quickly — within minutes in severe cases.
Don’t drive at all if the oil level drops noticeably between checks or you can’t identify the source. A minor leak costs little to fix. Driving with insufficient oil can turn a simple repair into an engine rebuild.
When You Can Fix It Yourself vs When to Go to a Garage
Fixes That Are Usually Safe for DIY
If you can clearly see the source and the oil level is stable, many post–oil change issues can be handled at home.
This includes reseating or replacing the oil filter, replacing a drain plug washer, correcting an overfill, or tightening a loose drain plug to the proper specification. These fixes don’t require special tools beyond safe access and basic care.
Fixes That Typically Need Tools or a Lift
Repairs involving gaskets or seals usually require better access, proper torque control, and sometimes component removal.
Oil pan gaskets, valve cover gaskets, damaged drain plug threads, rear main seals, and timing cover leaks are best handled by a shop. These jobs often look simple on the surface but can become costly if done incorrectly.
Symptoms That Mean “Do Not Drive”
If the oil pressure warning light comes on, oil is pouring out rapidly, the dipstick level drops quickly, or you see smoke from oil contacting hot exhaust parts, stop driving. These are signs that continued operation could damage the engine.
When You Should Go Back to the Shop
If a service centre did the oil change and the leak appeared immediately afterward, return to them and explain when it started. Reputable shops reinspect the vehicle, tighten or reseat components, and replace faulty filters or washers — usually at no charge for installation-related issues.
If the leak originates from a worn gasket or seal that was already failing, the shop didn’t cause the problem. The oil change made it visible. Go back calmly, show them where the leak is coming from, and let them assess it before anyone else touches the car. Most honest shops would rather have the opportunity to inspect their own work.
Who Is Responsible For Oil Leak After Oil Change?
If the leak clearly originates from the drain plug or filter area and started right after a professional service, the shop is responsible for the installation error. A loose drain plug, missing washer, or incorrectly fitted filter are service mistakes — reputable shops fix these without charge.
If the leak comes from higher up on the engine — a valve cover gasket, oil pan seal, or timing cover — the oil change exposed an existing problem rather than created one. In that case the shop isn’t responsible for the underlying wear, though a good shop will tell you this directly rather than letting you assume the service caused it.
Estimated Repair Costs for Oil Leaks After Oil Change
Costs vary depending on vehicle type, labor rates, and location, but the table below reflects realistic average ranges for common post–oil change leak causes.
| Repair Issue | Typical Repair Needed | Estimated Cost Range (USD) |
|---|---|---|
| Loose drain plug | Retighten or replace washer | $5 – $25 |
| Damaged drain plug threads | Repair or replace drain plug | $50 – $150 |
| Oil filter improperly installed | Remove and reinstall / replace filter | $10 – $40 |
| Double oil filter gasket | Remove filter, clean surface, reinstall | $20 – $60 |
| Overfilled engine oil | Drain excess oil | $20 – $75 |
| Valve cover gasket leak | Replace valve cover gasket | $80 – $350 |
| Oil pan gasket leak | Replace oil pan gasket | $150 – $500 |
| Rear main seal leak | Replace rear main seal | $500 – $1,200+ |
Why Some Leaks Appear One or Two Days Later
Usually, oil spots are noticed a day after changing oil, but not immediately after the procedure. This is because any oil that is left after the service will drip off from the engine cross-members, frame rails, and other places within the next one or two days. Once the spots stop appearing and the oil does not reduce, there is no leakage.
If new oil spots continue forming consistently each day, the leak is active and needs to be traced.
If the car consistently leaks oil while parked — not just after a service — see the full guide on car leaking oil while parked for all possible causes beyond the oil change itself.
How To Prevent Oil Leak After Oil Change
Whether doing it yourself or having it done professionally, a few habits eliminate most post-change leaks:
- Always replace the drain plug washer — never reuse a crush washer
- Clean mating surfaces before installing the new filter
- Lightly lubricate the filter gasket before installation
- Tighten the filter by hand only — never with a wrench
- Use the correct oil quantity and verify with the dipstick
- Check underneath after the first short drive
A two-minute inspection after the first trip prevents the problem from developing unnoticed.
Last Updated: April 2026
FAQs
If the leak started immediately after service and oil is coming from the drain plug or filter area, it points to a loose plug, missing washer, or incorrectly fitted filter. A leak higher up on the engine is more likely a worn gasket the oil change exposed rather than caused.
A small drip with a stable dipstick level is usually safe for short distances while heading to a garage. Stop driving immediately if the oil pressure warning light comes on, oil is actively pooling, or the dipstick level is dropping between checks.
Residual oil spilled during the service drips slowly off engine components for one to two days after the change. If fresh spots stop forming and the oil level stays stable, it is spillage not a leak. If spots continue daily, the leak is active.
Fresh oil does not damage a healthy engine but it can reveal seals or gaskets that were already close to failing. Old sludge can temporarily mask weak points — new clean oil finds them.
No, identify and fix the mechanical cause first. Sealers do not fix loose components or damaged gaskets and can cause problems in some engines.